AWS Lightsail is a great platform for hosting websites on your own. Lots of benefits and very little technical expertise is needed. You can try it today for FREE for a couple of months. Check out AWS Lightsail pricing for current costs. This guide is written for Mac users, but Windows users can also develop your AWS LightSail server if you follow along. Video included.
BENEFITS OF AWS LIGHTSAIL:
- Super Fast Hosting
- Not Sharing with ANYONE
- Your Own DEDICATED IP ADDRESS
- Easy to Launch
- Easy to Maintain
You can host approximately 265 sites on an Amazon Lightsail Instance with this system. It does not offer email services. There is a workaround which I explain at the bottom of this post.
Personal Experience: I like this as a small solution for web hosting. It’s nice because you separate yourself by having your own IP address and the speed of AWS LightSail for hosting websites is pretty good. I’ve put several clients onto this as a solution, rather than having them use shared hosting on some of the platforms where your website can be one of hundreds or even thousands of sites sharing processors and IP addresses.
If someone were to ask me to rate AWS LightSail on a scale of 1-10, I’d rank it like this:
10 – Reliability
9 – ease of use
10 – flexibility for use from Mac or PC
9 – carefree (not needing a lot of maintenance)
10 – Security
9 – Pricing
Overall, it’s a great deal. If you go to a hosting company and want to get your dedicated IP address, they’d charge a minimum of $5 per month for that. AWS Lightsail includes that in their already low monthly price. That makes it hard to beat. And I truly believe that having your own IP address helps with SEO too.
Step 1 Signup for Amazon Web Services.
Step 2 Go to Light Sail, and choose “create an instance”.
There is a ‘follow along’ video at the bottom of this post.
Step 3
Pick Instance Zone (I use Ohio because its in the middle of the country)
Pick your Size of Instance and features.
Pick Linux/Unix & OS Only
Pick the latest version of Ubuntu
Create an SSH key pair and download yours.
Choose a pricing plan.
Give your instance a name
Then hit Create Instance and wait…
Step 4
Once the instance is Running, Click the 3 stacked dots and choose MANAGE
Click on Networking
Under the IP address, choose “Attach static IP”
Give it a name (I usually keep it the same as the Instance Name)
Create and attach.
Continue
Reboot
Document your new IP address
Choose Connect Menu & Connect using SSH
Step 5 Run Updates for Ubuntu
Paste this:
sudo apt update && sudo apt upgrade -yWait for it to finish (5 minutes later) then type sudo reboot
Close the window and wait about 2 minutes for it to finish the upgrade
Connect using SSH again
Step 6 Run the CyberPanel install
Paste this:
sudo su - -c "sh <(curl https://cyberpanel.net/install.sh || wget -O - https://cyberpanel.net/install.sh)"Wait again,,,
CyberPanel Installer v2.1.2
RAM check: 184/981MB (18.76%)
Disk check: 7/30GB (27%) (Minimal 10GB free space)
1. Install CyberPanel with OpenLiteSpeed.
2. Install with LiteSpeed Enterprise.
3. Exit.
Type 1 (enter)
Create a password (make it good)
Other questions you have to answer:
Memcached (default Y): Y
Redis (default Y): Y
Watchdog (default Yes): Yes
Finalize.
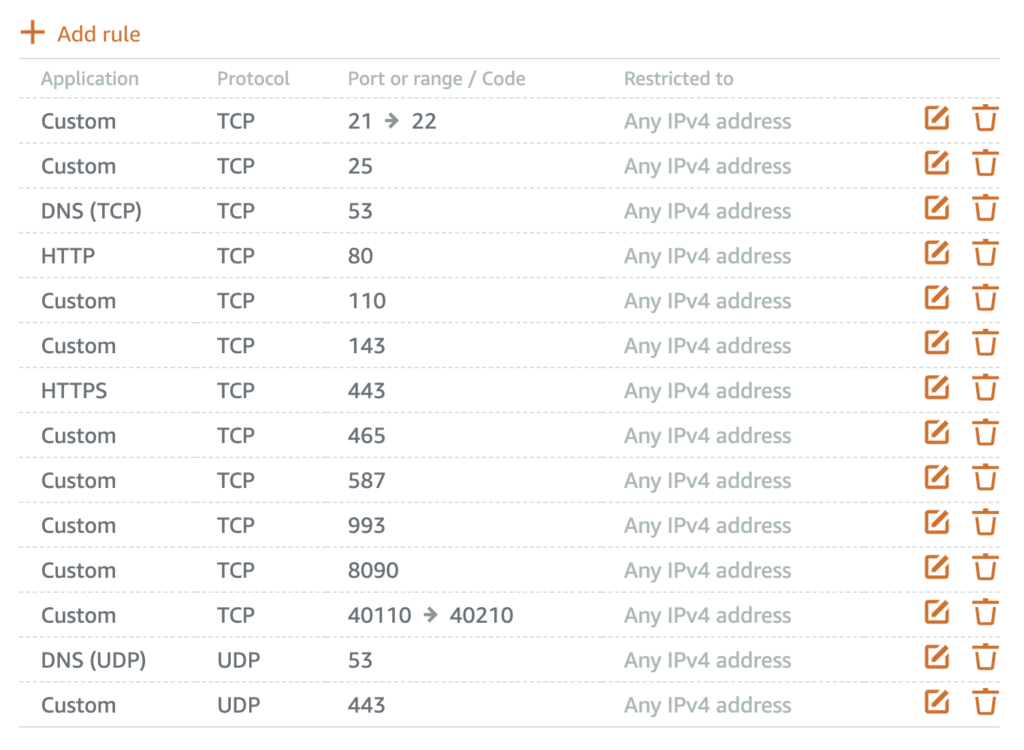
Setup ports in Networking:

Restart
Now access it in a browser: (your IP address):8090
User Admin
Password (the one you made up)
WARNING: Lightsail does not allow you to send emails from the server. HOWEVER: You can add an SMTP plugin to your WordPress sites and then this plugin can send emails from your WordPress installation.
Follow Along Video:
Once you’re setup and running, check out my other articles to learn how to tune your WordPress site for better Optimizing Search Placement and great, inexpensive SEO tools.


